당근 마켓 클론 코딩
0. 개발 목표
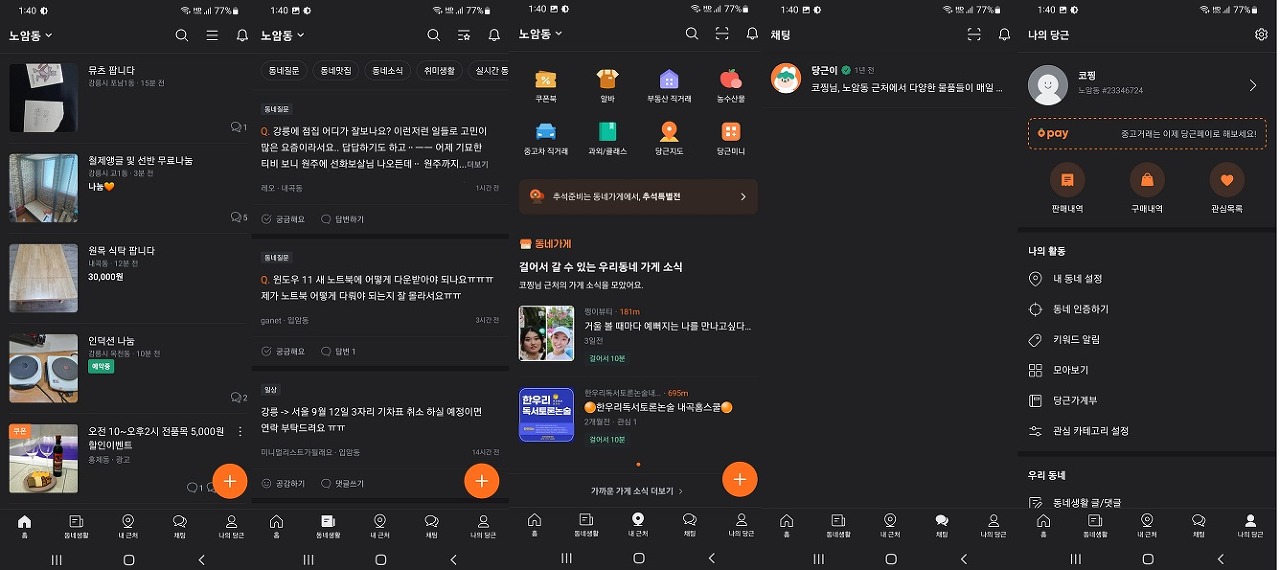
- 와이어프레임 대신 어플리케이션을 캡쳐하여 최대한 비슷하게 구현하자 정함
- 메인기능인 마켓 거래를 위한 홈, 상세보기, 거래신청, 채팅
- 동네생활은 간단한 커뮤니티, 댓글
- 내근처는 위치기반으로 잡아야해서 시간배분상 불가능으로 판단하여 포기
- 채팅은 메인 거래기능이랑 연동하여 동작하도록 설정
- 마이페이지는 프로필, 판매내역, 구매내역, 관심목록을 만들어서 좋아요, 구매 프로세스, 판매 프로세스에 따라 구현
1. API 설계
- 회원가입
- 로그인
- 전화번호 중복 검사
- 닉네임 중복 검사
- 주소등록
- 로그아웃
- 게시글 작성
- 게시글 수정
- 게시글 삭제
- 게시글 조회
- 게시글 전체 조회
- 사진 업로드
- 수정사진 업로드
- 상품상태변경 (판매중, 예약중)_
- 상품상태변경 (거래완료, 나눔완료)_
- 판매글id당 채팅방목록 조회
- 관심상품 누르기
- 관심상품 취소
- 관심상품확인
- 판매자 상품 목록 조회
- 연관 카테고리 상품 목록 조회
- 닉네임 수정
- 주소 수정
- 회원정보 조회
- 판매글 목록조회
- 구매글 목록조회
- 관심상품 목록조회
- 채팅방생성
- 게시글에 있는 자신이 속한 채팅방 번호 찾기
- 내 채팅방들 보기
- 최근 채팅 메세지들 불러오기
- 게시글 작성
- 게시글 목록 보기
- 게시글 상세보기
- 댓글 쓰기
- 댓글 목록가져오기
2. 채팅구현
useEffect(() => {
		// 받아지는 메세지가 없을 때는 동작하지 않도록 지정
        if (receivedData === '') return;
        setChat([...chat, { name: JSON.parse(receivedData).sender, message: JSON.parse(receivedData).message }]);
    }, [receivedData])

	// 처음 채팅방을 연결하는 함수
    const onClickConnectBtn = () => {
    	// 라이브러리가 아닌 Websocket을 이용한 채팅 구현
        const sock = new WebSocket(process.env.REACT_APP_CHAT_HOST);
        // 메세지가 오는 것을 onmessage를 통해 받아서 함수를 통해 데이터 출력
        sock.onmessage = function (e) {
            setReceivedData(e.data)
        }
        //채팅 websocket을 state로 지정
        setSockjs(sock);
        // setChat([...chat, { name: localStorage.getItem("name"), message: "님이 입장하셨습니다." }])
        setLive(true);
    }

    // 채팅 종료시 동작하는 함수
    const onClickDisconnectBtn = () => {
        setLive(false);
        // 채팅방을 나가도록 설정
        navigate(-1);
    }

    // 메세지를 작성하는 함수 (input창에 메세지가 작성된 것을 이용)
    const inputMessage = (e) => {
        setMessage(e.target.value);
        setMal({ ...mal, message: e.target.value });
    }
    // 엔터를 이용해서 메세지를 보낼 수 있도록 설정
    const onEnter = (e) => {
        if (e.keyCode === 13) {
            sendMessage();
        }
    }

    //메세지를 보내는 함수
    const sendMessage = () => {
        if (message === '') return;
        // setChat([...chat, { name: "testUser", message: message }])
        // console.log(message)
        // console.log(sockjs)
        // console.log(JSON.stringify(mal))
        // JSON 형식으로 변환하여 데이터 전달
        sockjs.send(JSON.stringify(mal));
        // sockjs.send(message);
        setMessage('');
    }
- socket.io를 이용하여 구현하려 하였으나, spring과 처음 연결을 시도하던 중 사용의 어려움을 느껴 변경
- 순수 Websocket 연결방식을 이용하여 채팅 구현
- Websocket을 이용하여 해당 url로 서버를 통해 연결
- 값을 주고받는 방식은 JSON방식으로 데이터를 주고 받음
3. 채팅 디자인
{content?.data?.data?.slice().reverse().map((a, i) => {
                                        return (
                                            <div key={i} >
                                                {a.nickname === localStorage.getItem("name") ?
                                                    <div>
                                                        <div style={{ backgroundColor: "white"}}>
                                                            <p style={{backgroundColor:"white", marginRight:"10px", textAlign:"right"}}>{a.nickname}</p>
                                                        </div>
                                                        <div style={{backgroundColor:"white", display:"flex", justifyContent:"flex-end"}}>
                                                            <p style={{backgroundColor:"#FF7E36",textAlign:"right",width:"fit-content", padding:"10px", borderRadius:"10px", textAlign:"right", color:"white"}}>{a.message}</p>
                                                        </div>
                                                    </div>
                                                    : <div >
                                                        <div style={{ backgroundColor: "white" }}>
                                                            <p style={{backgroundColor:"white", marginLeft:"10px"}}>{a.nickname}</p>
                                                        </div>
                                                        <div style={{backgroundColor:"white"}}>
                                                            <p style={{backgroundColor:"#e0e0e0",width:"fit-content", padding:"10px", borderRadius:"10px", marginLeft:"10px"}}>{a.message}</p>
                                                        </div>
                                                    </div>
                                                }
                                            </div>
                                        )
                                    })

                                    }
- 로컬스토리지에 저장된 닉네임을 기준으로 본인과 상대방을 구분하여 말풍선 출력
- 말풍선은 백그라운드 값을 통해 배경 정렬
- 본인 자리는 text-align 옵션을 통해 오른쪽으로 정렬
- 말풍선 크기는 fit-content 옵션을 통해 채팅으로 작성된 글자 수 만큼의 크기 할당
- 옵셔널체이닝을 통해 값이 들어있지 않아도 동작되도록 조치
4. 머터리얼 ui 테마 설정 ( mui theme )
//나의 당근 헤더
import ArrowBackIosNewIcon from '@mui/icons-material/ArrowBackIosNew';
import MoreVertIcon from '@mui/icons-material/MoreVert';
import { AppBar, Toolbar, IconButton, Typography, Box} from '@mui/material';
import { ThemeProvider, createTheme } from '@mui/material/styles';
import { useNavigate } from 'react-router-dom';


const BackHeader = () => {
    const navigate = useNavigate();
    return  (
        <Box sx={{ flexGrow: 1 }}>
        <ThemeProvider theme={whiteTheme}>
        <AppBar position="static" color="primary"
        style={{outline:"none", boxShadow:"none", borderBottom:"1.5px solid grey"}}>
          <Toolbar>
          <IconButton
          size="large"
          aria-label="search"
          color="inherit"
          onClick={()=>{navigate(-1)}}>
              <ArrowBackIosNewIcon/>
            </IconButton>
            <Typography
              variant="h5"
              noWrap
              component="div"
              sx={{ flexGrow: 1, alignSelf: 'center' }}
            >
            </Typography>
            <IconButton
              size="large"
              aria-label="display more actions"
              edge="end"
              color="inherit"
            >
              <MoreVertIcon />
            </IconButton>
          </Toolbar>
        </AppBar>
        </ThemeProvider>
      </Box>
    )
}

export default BackHeader;

const whiteTheme = createTheme({
  palette: {
    primary: {
      main: '#ffffff',
    },
  },
});
- createTheme를 이용하여 테마의 메인 컬러 결정
- provider을 설정하여 theme 적용
- BottomNavigation 의 경우 (푸터) 테마적용이 잘 먹지않아서 makeStyles을 이용하여 테마 적용
const useStyles = makeStyles(theme => ({  // style 요소 선언
    container: {                          // container이름의 객체에 스타일링 해주기
        backgroundColor: 'white',
        position: "fixed",
        bottom: "0",
        width: "100%",
        justifyContent: "space-between",
        borderTop: "1.5px solid grey"
    },
    color: {
        color: "black",
        "&.Mui-selected": {
            color: "black",
            fontWeight: "bold"
        },
    }

}));
- 클레스네임 적용방법과 유사하게 적용
const Footer = ({ foot }) => {
    const classes = useStyles();
    const [value, setValue] = useState(foot)
    const navigate = useNavigate();
    return (
        <>
            <Box sx={{ flexGrow: 1, color: 'text.primary' }}>
                <BottomNavigation
                    showLabels
                    value={value}
                    className={classes.container}
                    onChange={(event, newValue) => {
                        setValue(newValue);
                    }}>
                    {foot === 0 ?
                        <BottomNavigationAction
                            onClick={() => { navigate("/") }}
                            label="홈"
                            className={classes.color}
                            icon={<HomeIcon />} />
                        : <BottomNavigationAction
                            onClick={() => { navigate("/") }}
                            label="홈"
                            className={classes.color}
                            icon={<HomeOutlinedIcon />} />
                    }
                    {foot === 1 ?
                        <BottomNavigationAction
                            onClick={() => { navigate("/post") }}
                            label="동네생활"
                            className={classes.color}
                            icon={<LibraryBooksIcon />} />
                        : <BottomNavigationAction
                            onClick={() => { navigate("/post") }}
                            label="동네생활"
                            className={classes.color}
                            icon={<LibraryBooksOutlinedIcon />} />
                    }
                    {foot === 2 ?
                        <BottomNavigationAction
                            onClick={() => { navigate("/location") }}
                            label="내근처"
                            className={classes.color}
                            icon={<PinDropRoundedIcon />} />
                        : <BottomNavigationAction
                            onClick={() => { navigate("/location") }}
                            label="내근처"
                            className={classes.color}
                            icon={<PinDropOutlinedIcon />} />
                    }
                    {foot === 3 ?
                        <BottomNavigationAction
                            onClick={() => { navigate("/chat") }}
                            label="채팅"
                            className={classes.color}
                            icon={<ForumIcon />} />
                        : <BottomNavigationAction
                            onClick={() => { navigate("/chat") }}
                            label="채팅"
                            className={classes.color}
                            icon={<ForumOutlinedIcon />} />
                    }
                    {foot === 4 ?
                        <BottomNavigationAction
                            onClick={() => { navigate("/mypage") }}
                            label="나의당근"
                            className={classes.color}
                            icon={<PersonIcon />} />
                        : <BottomNavigationAction
                            onClick={() => { navigate("/mypage") }}
                            label="나의당근"
                            className={classes.color}
                            icon={<PersonOutlineOutlinedIcon />} />
                    }
                </BottomNavigation>
            </Box>
        </>
    )
}
- classes.continer을 통해 useStyles값을 할당
5. 금액처리
<div>{data?.price.toString().replace(/\B(?=(\d{3})+(?!\d))/g, ",")}원</div>- 금액관련하여 ,를 천단위당 찍어주기위해 replace함수 사용
* 깃허브 주소
https://github.com/Yoepee/Clone-Coding
GitHub - Yoepee/Clone-Coding: 당근마켓 클론코딩 [ 22.09.09 - 22.09.16 ]
당근마켓 클론코딩 [ 22.09.09 - 22.09.16 ]. Contribute to Yoepee/Clone-Coding development by creating an account on GitHub.
github.com
*영상 공유
https://www.youtube.com/watch?v=BmB7c9jov54